Showing posts with label Scrapbook Adhesives. Show all posts

Thursday, September 29, 2016

Lawn Fawn & Scrapbook Adhesives + video!

Hi!!
It's Scrapbook Adhesives & Lawn Fawn week so we're using product from both companies to create our projects. And I made a video tutorial of my card too :)

I love making cards with layers using acetate. I made some of them in the last years so I wanted to share my process. It's nothing fancy but I love the results and I hope you like this project too!


Because I missed the last inspiration week (I've been super super busy working) I wanted to use one of the sets featured during that week. I chose Snow Cool, which is super adorable by the way, to create my scene.


All the adhesives I used on the card are from Scrapbook Adhesives and you can see all the process in the video. I included spanish subtitles as well.


As I love to include some kind of surprise in my cards, I hide the sentiment in the inside, just behind the smalles hill :)

Thank you so much for stopping by! I hope you have a great day!

Supply list:
- Lawn Fawn stamps: Snow Cool
- Lawn Fawn dies: Snow Cool, Stitched Hillside Borders
- Lawn Fawn ink: Lavender
- Distress inks: Lavender, Wilted Violet
- Memento ink Tuxedo Black
- Versamark ink
- Versamagic Aquatic Splash
- White embossing powder
- Scrapbook Adhesives
- Copic markers
- Acetate sheet

Wednesday, March 11, 2015

Lawn Fawn recipe book with Scrapbook Adhesives

Hello!!
Last week we celebrated Lawn Fawn & Scrapbook Adhesives week and I made a recipe book that you've probably already seen at the Lawn Fawn blog.

I wanted to share it here too with some explanations on how I made it.

Sweet recipes book

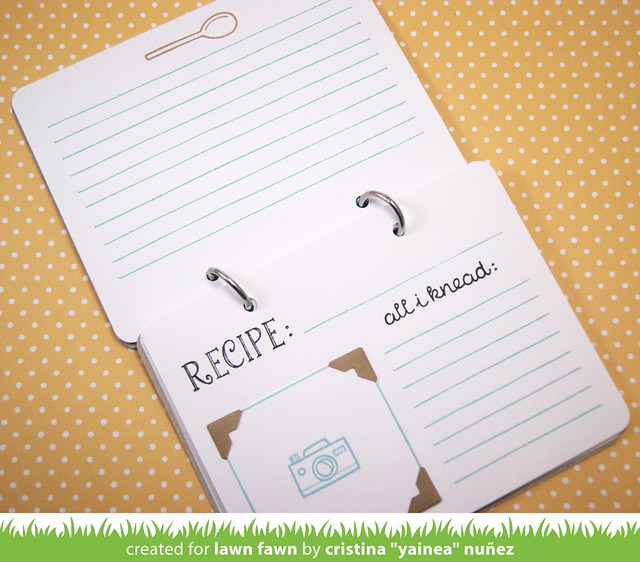
The size of the recipe book and each of the recipe pages are 4 1/4" x 5 1/2", just the size of a standard card base so I can got 4 pages from each white cardstock (I used Neenah).

First I rounded the corners and made the holes of each page and then I placed my stamps on a Fiskars Stamping Press to help me stamp always in the same place. I used Sally's ABCs for "RECIPE" and then one of the sentiments from Baked with Love.

The lines were made with School Backdrops, placing some washi tape on the sides of the page so the ink doesn't reach the edges. Of course you can make this with a pen and a ruler.

Finally I adhered the Scrapbook Adhesives corners to hold a picture of the recipe. I placed a piece of cardstock with a stamped camera instead so it looks pretty until I add a real picture.

Sweet recipes book - inside

For the front page I used a thicker cardstock (also Neenah) and adhered two stripes of patterned paper from Pint Sized Patterns: Beachside. Then I stamped, colored with Copic markers and cut all the little images from Baked with Love and arranged them together on the base. For the frame I used a Scrapbook Adhesives 3D foam sheet that I cut with the frame die to give it some dimension.

I used my Crop-A-Dile to make the holes and put a pair of pretty eyelets so the book looks more professional (or cute, at least haha).

Sweet recipes book - front

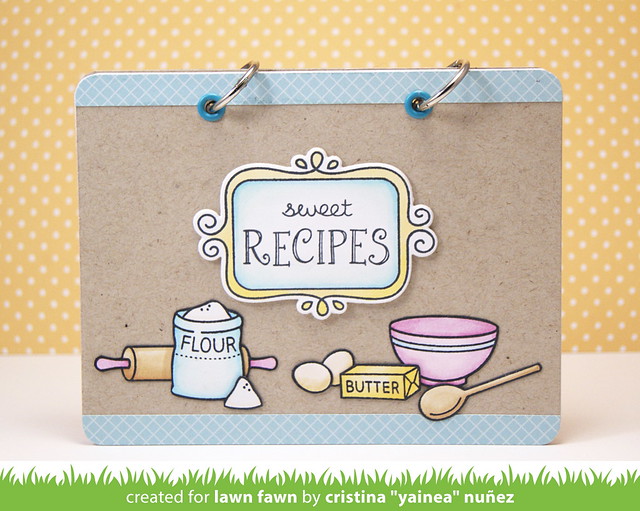
The same explanation works for the back side, where I used the image and sentiment from Baked with Love too.

Sweet recipes book - back

I hope you like my little project, I think I'm going to use it or maybe make another in Spanish. The good thing is that you can add as many pages as you need and if you consider that it takes too long to make each page (it's not too much if you work in an organized way, I tell you :)) but you can always print the inside pages with a design you create on the computer :)

If you have any doubts, just send me an email! Thank you so much for stopping by, huuuuuugs!!

Supply list:
- Lawn Fawn stamps: Flirty Frames, Baked with Love, Sally's ABCs, Say Cheese too, School backdrops
- Lawn Fawn dies: Flirty Frames
- Lawn Fawn paper: Pint Sized Patterns
- Lawn Fawn ink: Mermaid
- Scrapbook Adhesives adhesive runner
- Scrapbook Adhesives Dodz
- Scrapbook Adhesives 3D foam adhesive sheets
- Scrapbook Adhesives creative photo corners
- Copic markers
- Memento ink: Tuxedo Black

Monday, June 16, 2014

Avery Elle & Scrapbooking Adhesives week

Hi there!

This is my third post today! If you're here looking for my Lawnscaping challenge card click here. If you're here for my TAWS June guest designer cards, click here. Or just scroll down :)

It's Scrapbook Adhesives by 3L and Avery Elle week!  This week the Avery Elle design team is playing with some of the most popular products from Scrapbook Adhesives by 3L such as their 3D Foam, E-Z Runners, Adhesive Sheets, etc.  After visiting here, be sure to check out the Scrapbook Adhesives by 3L blog for even more inspiration using both companies products!  Don't forget to comment on the blogs throughout to week to be entered to win a fabulous prize!


I made two cards mixing products from both companies and I had so much fun!

On my first one I used 3D foam and Dotz and I combined some different sets from AE, you know I love doing that! ;)


For my second card I used 3D foam hearts covered in glitter to create a very simple anniversary card


I hope you feel inspired, don't forget to visit Avery Elle blog to see what Caryn has for you too! Hugs!!

Supply list:

First card
- Avery Elle stamp sets: Many Thanks, Red & Goldie, Woodgrain & More, Storybook
- Avery Elle inks: Pure White, Celery
- Scrapbook Adhesives: 3D Foam white squares, adhesive sheet, Medium Dotz
- Memento ink: Rich Cocoa
- Copic markers
- May Arts rustic twine

Second card
- Avery Elle stamp sets: So Happy
- Scrapbook Adhesives: 3D Foam hearts, 3D Foam white squares
- Simon Says Stamp stencil: Falling hearts
- Distress glitter: Tumbled Glass
- White embossing paste
- Blue thread
- Echo Park Paper: Dots & Stripes

Wednesday, December 18, 2013

Lawn Fawn + Scrapbook Adhesives week

Hi!
This week the all Lawn Fawn DT are teaming up with the people of Scrapbook Adhesives, this is the third day so if you've been missing it, don't forget to check out their blogs!

I've received some products from Scrapbook adhesives and I'm loving everything so thank you so so much!! One of my favorite products are Thin 3D Foam squares, I love playing and combining them with the normal ones for fun levels of dimension!

So, here's my card! A fun birthday card using Love You Tons and Trim the Tree (Yay! I love finding more uses for Christmas stamps!)


The little balloons are from So Much to Say and the sentiment from Happy Everything. I hope you like it!!

Thank you so much for stopping by, have a great week!!

Supply list:
- Lawn Fawn stamps: Love You Tons, Trim the Tree, So Much to Say. Happy Everything.
- Lawn Fawn papers: Pink Lemonade
- Memento ink: Tuxedo Black
- Hero Arts inks: Bubble Gum, Green Hills, Splash
- Papertrey ink oval dies
- Crop-a-Dile
- Copics

Monday, November 5, 2012

Halloween leftovers

Hi!!
I hope you had a lovely weekend! I've been on a trip all week with my boyfriend, we were visiting Budapest, Hungary so even when I made some Halloween projects in advance, a cause of some technical issues and lack of time I couldn't post them and I missed Halloween!! >.<

I took photos of 3 projects and I have other 3 not completely finished that I'll not share this time. It's a whole year until next Halloween so I can't wait so long to share the ones I have photos of. I hope you enjoy them :)

The first project I want to show you is a card that you have propably seen on Lawn Fawn blog this week. We teamed up with Scrapbook Adhesives and created a project using their products. I must say I've never used them before and I totally love them! Love the thinner 3D foam dots combined with the normal ones to create a lot of dimension. I also love the little glue dots, they're super useful!


So I made a Halloween card combining lots of Lawn Fawn sets. I really enjoy doing this!! Here are a pair of phone pics of how I made the owl. I masked all the owl except from the scarf and stamped the little stars from Critters Ever After.


Supply list:
- Lawn Fawn stamps: Winter owl, Hats off to you, A birdie told me, Critters Down Under, Critters Ever After, Happy Everything and Belinda's Borders
- Lawn Fawn Retro trimmings
- Scrapbook Adhesives
- Doodlebug Design papers: Haunted Manor 6x6 pad
- Memento inks: Tuxedo Black and Grape Jelly
- Googly Eyes
- Copics

My second project features a Deasy Designs stamp set. The sad news is that the clear stamps from this company are no longer available but you can purchase it as a digital stamp here.


Well, I made a set of Halloween treat bag toppers, and I love them! I used a lit of the images in the set following the same scheme for the four different toppers. I LOVE the spooky skyline so I clear embossed it to create my background, then I colored with copics some of the images and place them with foam adhesives. I added some googly eyes here and there for more fun!


Supply list:
- Deasy Designs stamps: Boo to You
- Doodlebug Design papers: Haunted Manor 6x6 pad
- Copics
- May Arts ribbon
- Bazzil Card Shoppe colored cardstock
- Googly Eyes
- Scrapbook Adhesives: 3D foam dots and adhesive runner
- Versafine ink: Onyx Black
- Versamark ink and clear embossing powder

My third project is a fun card full of googly eyes and glitter! I used glue dots from Scrapbook Adhesives to place all those eyes super quicky!


Supply list:
- Lawn Fawn stamps: Teeny Tiny backdrops and Sally's ABCs
- Googly eyes
- Doodlebug Design papers: Haunted Manor 6x6 pad
- Scrapbook Adhesives
- American Crafts glitter tape
- Versafine Onyx Black
- Versamark ink
- WOW embossing powder in glitter gold
- Bazzil Card Shoppe colored cardstock
- Simon Says Stamp stars dies
- Faber Castell gold pen

Thank you for visitng my blog and sorry for being late with this post. Have a great week!